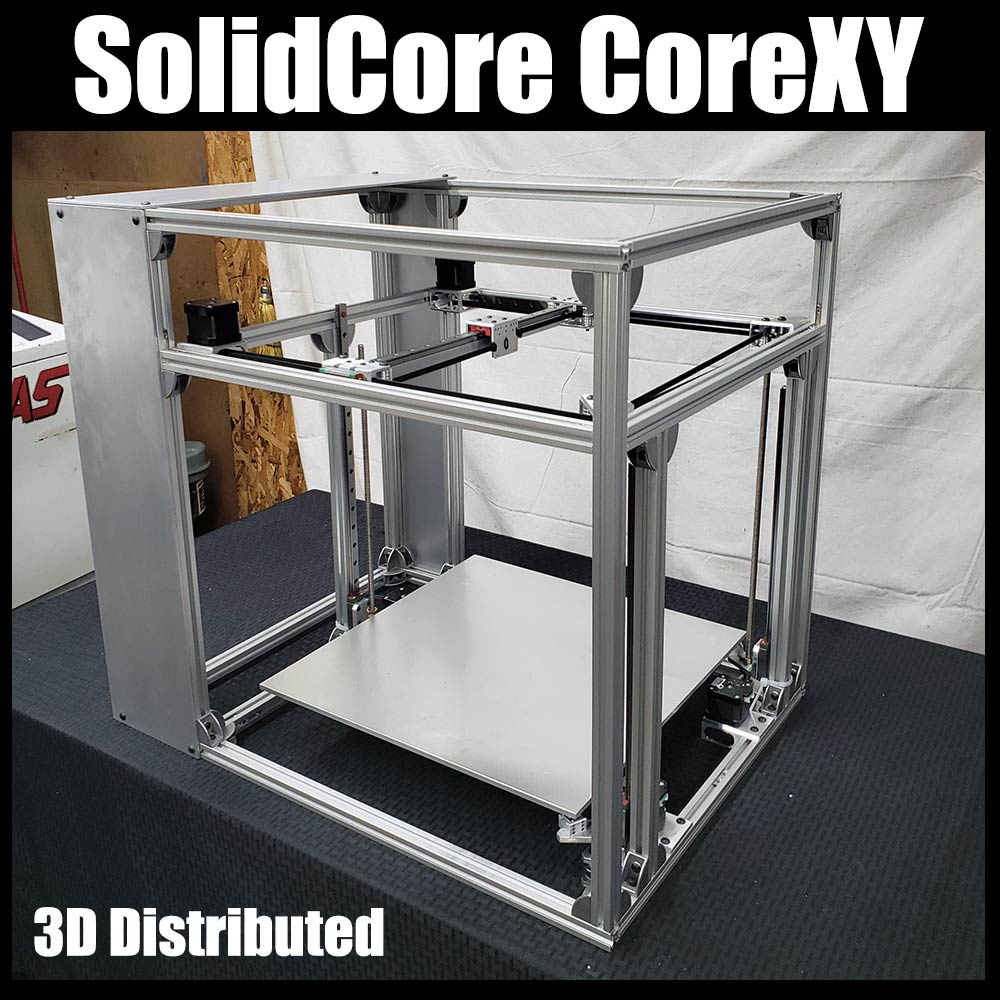
While the SolidCore printer design is still a work in progress, the corexy build is slowly materializing. For now, we decided to go with a simple corexy design but have future plans for a toolchanger and a heated chamber. The design goal is to build a reliable high speed 3d printer with high quality aluminum parts for 3d printing high temperature materials such as PEEK.
Designed and Developed by 3D Distributed:
- Shane Hooper
- Øyvind Sætre Amundsen

- Modular / Scalable
- All Metal or 3d printed
- Linear Rails
- Balanced Carriage Pull
- Enclosed or Enclosure Option
- Triple Z-Axis: Independent Driven or Shared Belt Routing
- Kinematic Coupled Bed
- Simple but Compact Design
SolidCore Related Content
SolidCore Thingiverse 3D Printer Build Plans
SolidCore Kinematic Bed Mounting System Setup
SolidCore 3D Printer Kits & Parts
-
 SolidCore CoreXY LightWeight Y-Carriage Upgrade$35.00
 -
 SolidCore 2020 Frame Gussets$13.00
 -
 SolidCore X-Carriage Set: Weight Reduced-Light Weight Upgrade$67.00
 -
 Kinematic Mounting Bracket Kit$75.00
 -
 MGN12 Linear Rail Stop-Alignment Tool 2020$10.00
 -
 Kinematic Coupling Mounts With Magnetic Preload$45.00
 -
 Kinematic Coupled Mounts$25.00
 -
 Triple Z Idler Mount Set$55.00
 -
 SolidCore Stealth XY-Motor Mounts Upgrade$50.00
 -
 SolidCore XY Idler Pulley Bracket$40.00
 -
 SolidCore CoreXY Mechanism with Motor Mount Upgrade$225.00
 -
 Kinematic Mounting Bracket-Fixed-Neutral$18.00
 -
 CoreXY Mechanism$185.00
 -
 SolidCore Printer Top Plates$45.00
 -
 Linear Rail Stop 2020$10.00
 -
 Belt Clamp$3.00
 -
 Endstop Switch Mount – 2040$8.00
 -
 SolidCore Side Plates$40.00
 -
 MGN12 2040 Carriage Stop-Linear Rail Alignment Tool$12.50
 -
 Hotend Mount BLtouch / E3D$20.00
 -
 SolidCore Z-Bracket$17.50
 -
 SolidCore Parts Kit$125.00
 -
 SolidCore Printer Parts Kit
 -
 Triple Z / Belted Z-Axis Motor Mount$20.00
 -
 SolidCore CoreXY Y-Carriage$25.00
 -
 SolidCore X-Carriage Kit
Modular Platform

Belt Path And Tensioning
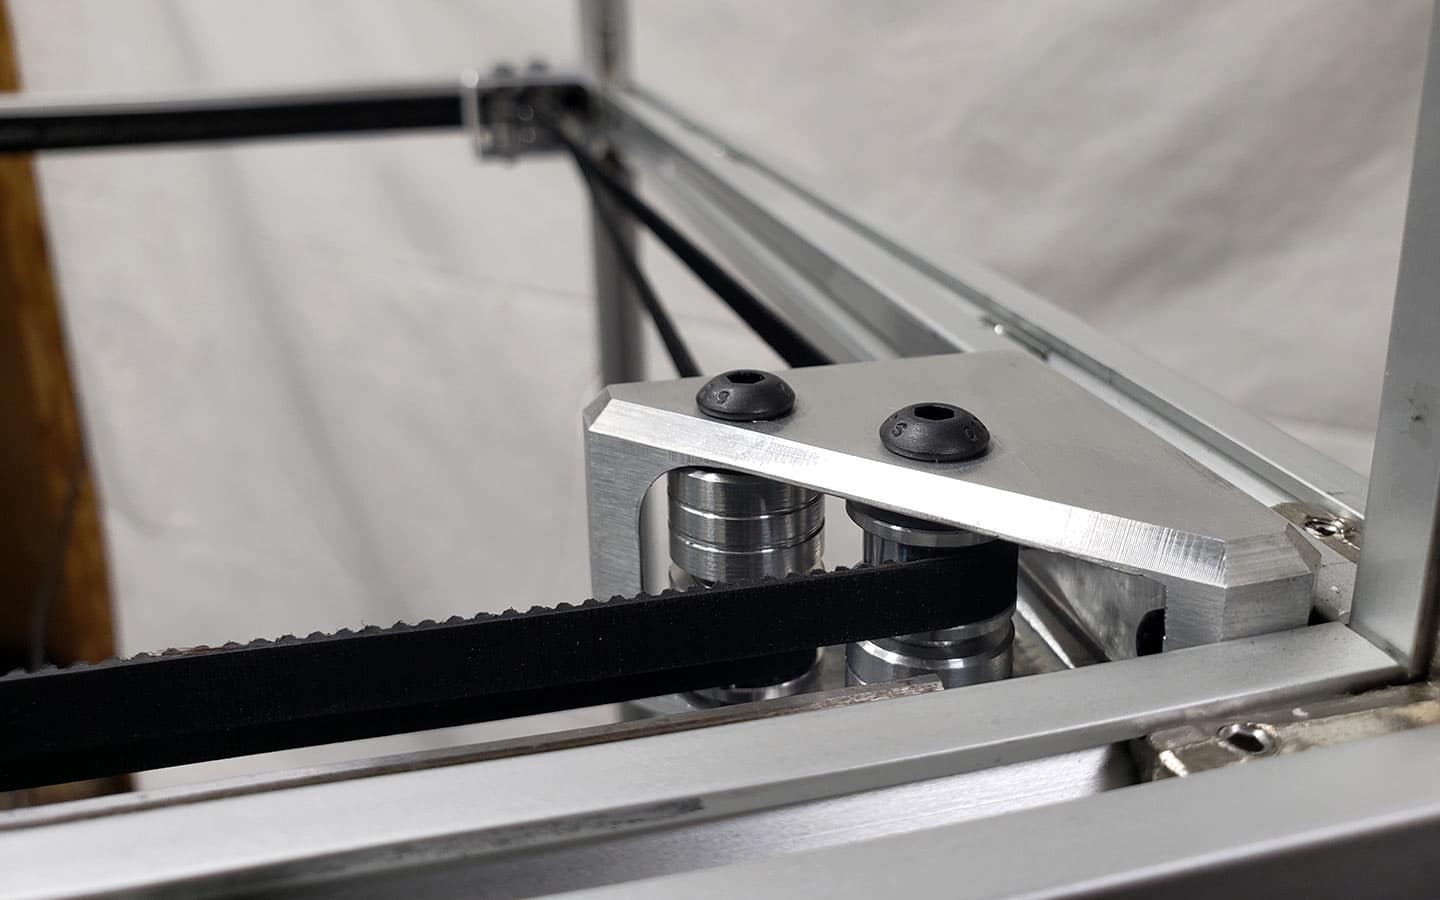
If you want accurate motion, you need a CoreXY 3d printer design with straight and parallel belt paths. Belt tensioning can change when the belt length changes as the gantry moves. Otherwise racking or belt tensioning issues may occur. Belt segment that changes length must be parallel to the axis as it moves to avoid racking or other undesired motion that can occur. Belt thickness must be taken into account when laying out your pulleys. The belt sections between motor mounts and idler mounts need to be parallel with the axis as the gantry travels across.

Bowden vs Direct Drive
A Bowden setup will let you have higher acceleration but a direct drive extruder will give you higher feedrate. The difference in acceleration is in print time and can make a noticeable difference.
- Direct drive gives you more control over the extruders and better print for flexible materials .
- Bowden gives you a lightweight carriage design and is better for higher acceleration.
The moving mass from a direct drive extruder from the size or weight at higher print speeds. Reverberations that happen with fast accelerations and jerk rates. A heavier carriage also increases these artifacts. missing steps, that happen with fast accelerations and jerk rates and increases these artifacts.


Our long term goal is to is to build a modular platform, not just a printer. Think of it as an ecosystem of parts that can be arranged in different configurations and adapted for unique applications.
- Mods
- Upgrades
- Customized Parts
Build Volume – Scalability

The SolidCore CoreXY design has the motor and idler parts assemble to the inside corners of the frame. This mechanical arrangement is better for adding an enclosure and scaling up the 3d printer size to a larger build area. Minimizing design constraints of overall 3d printer length and width makes the machine completely scalable and customizable.
Eventually we would like to have a spreadsheet or configuration tool that will allow you to input the current frame or linear rails that someone already owns and output length and rail options. Or if you’re aiming for a specific build area, you can input the data and it will output the frame and rail length options.
All Metal Parts

The SolidCore aluminum parts makes the printer into a highspeed workhorse for repeated use. All-metal-parts and components will give us the durability and repeatablility needed. But we want people to have the option to use 3d printed parts so they can upgrade later on. Solid all metal parts are durable and less likely to deflect at high printing speeds. The aluminum components are also less likely to breakdown over time when introduced to the forces and heat from repeated use.


Belt Tensioning
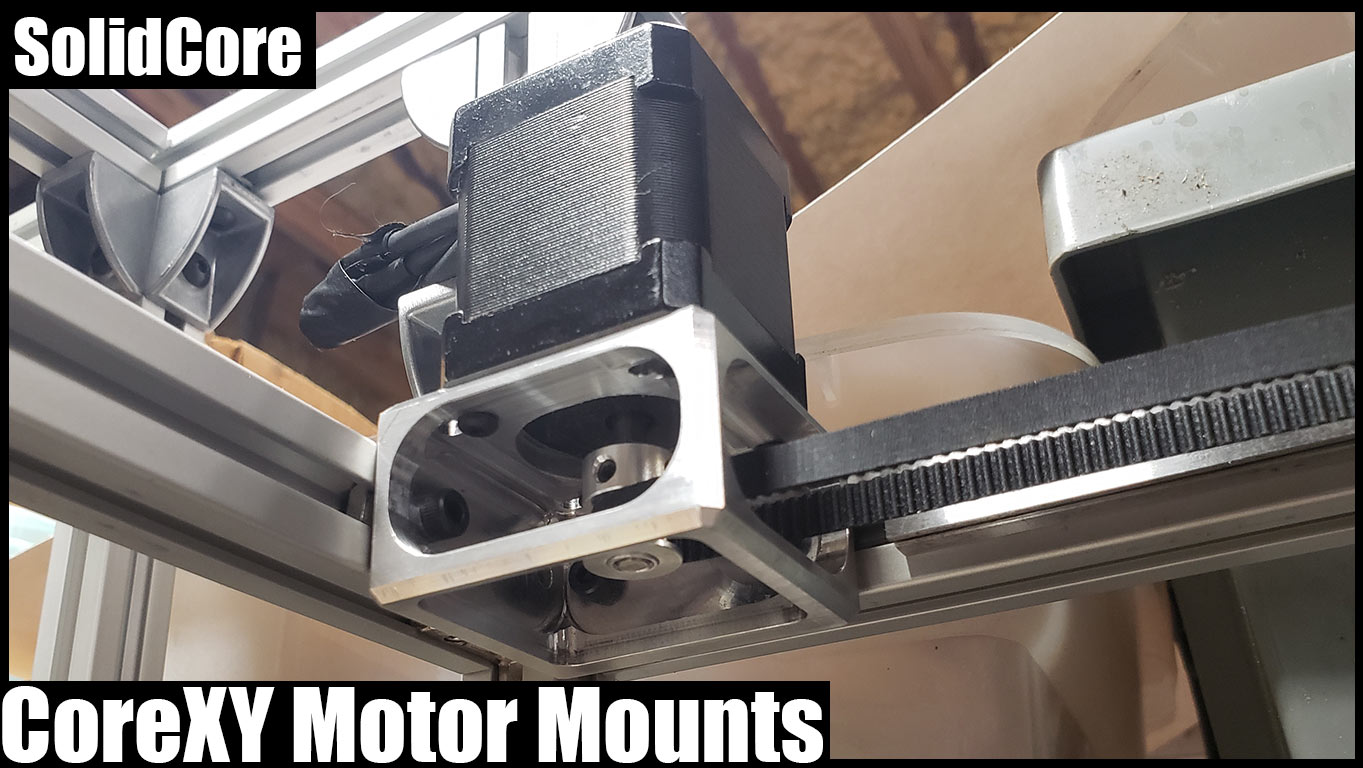
Belt tensioning is done with the XY motor mounts. The XY mounts have slots to allow the belt tension to be applied by pulling the motors back.

- High Speed
- Durable
- Repeatable

Carriage / Gantry

Carriage Design
The carriage and gantry are designed to be light weight and strong. We currently use c-shaped aluminum stock because it reduces machining time. The reduced machining time and minimized waste helps but it’s a compromise. That’s going to change soon. We’ll probably make some changes such as reorienting the the y-axis linear rail into a vertical position similar to the RailCore but the current horizontal version will be easier to adapt an E3D Toolchanger.
X-Carriage

The top plates or motor/belt mounting plates that mount the idler pulleys have recently changed as well. The motor/belt mounting plates shown position the z-axis motors on top vs the bottom of the machine. When I first designed the plates I thought it would look cool with the motors on top but after I machined everything I realized that moving the bed up and down could cause deflection in the main plates.
X-Carriage Parts List

See X-Carriage Parts List-Assembly Guide PDF
X-Carriage Parts List – BOM Guide
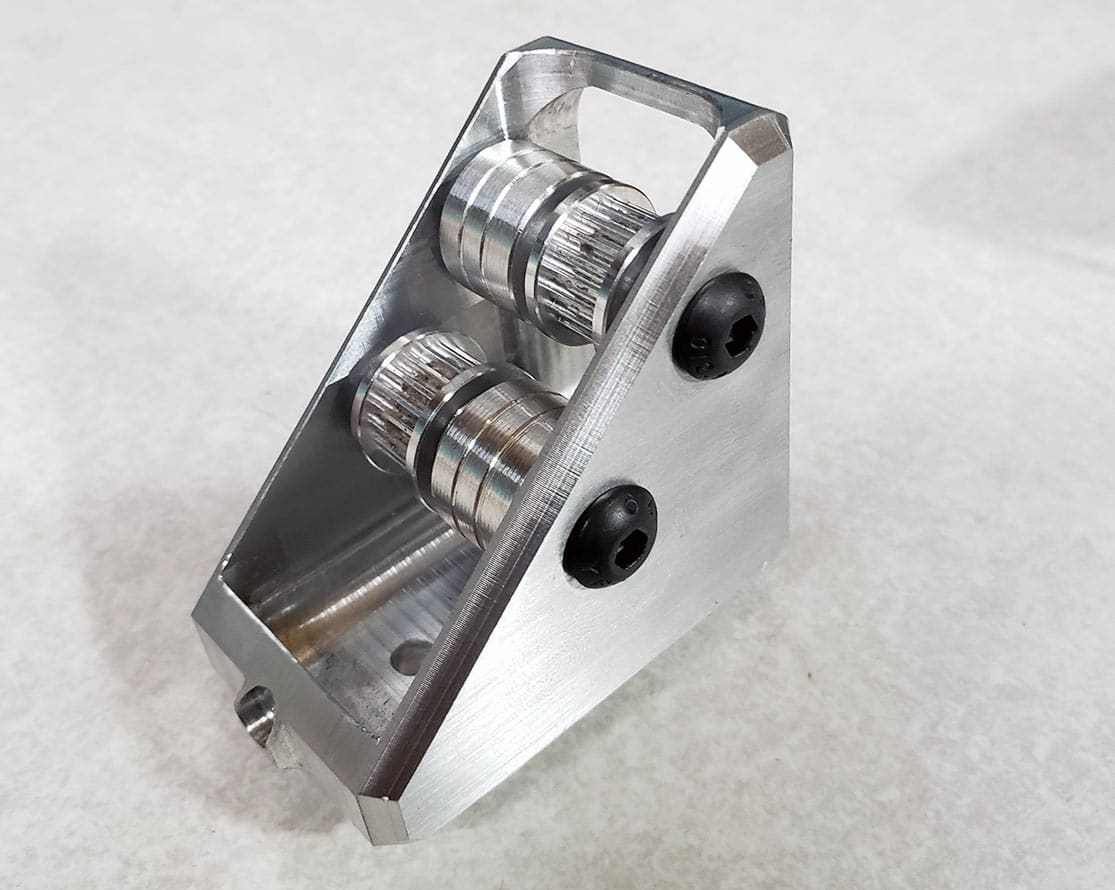
2 x Carriages
2 x MGN12H Rail Clamps
2 x GT2 Toothed Idlers
2 x GT2 Smooth Idlers
4 x M5 x 35mm Long Button Head Cap Screw
8 x M3 x 6mm Long Button Head Cap Screw
12 x M5 Steel Washers 1mm Thick
8 x M5 Nylon Washers
2 x GT2 Idlers
4 x 10.5mm Pulley Spacers
Aluminum X-Carriage Design Options
X-Carriage Design: Weight Reduction

SolidCore X-Carriage Set: Weight Reduced-Light Weight Upgrade
SolidCore X-Carriage Set: Weight Reduced
 X-Carriage-Weight-Reduced-light-weight-gant…
Motor Idler Plates
The left motor plates are going to be re-machined to give room for a tool changer setup.
The overall footprint of the machine relative to print volume is somewhat excessive. In order to have a solid enclosure design I had to move the motors inside the frame boundary. This sacrificed the overall printer size to print volume ratio.
We’re aiming to balance the pull to the center of carriage instead above it or below. It seems to be more rigid and minimize deflection. The belts are somewhat within the same plane of the three linear rails to avoid rocking cantilever loads that other designs may have with the belts up high or down low.
The original prototype was about 350mm x 350mm x 350mm print area but we now have a 200mm x 300mm and 400mm x 400mm build volume.
This design was inspired by the RailCore, HEVO, D-Bot, Mike Fisher’s QuadRod and Maarten van Lier’s corexy build.
SolidCore CoreXY Documentation
Extruder Carriage


Y-Carriage – Extruder Carriage Design


Top Plates

Triple Z-Axis: Independent Driven or Shared Belt Routing
With the build plate removed the single z-axis stepper motor with shared belt routing is shown.
The SolidCore has two different z-axis designs to move the print bed. The SolidCore picture shown on this page has the z-axis motors at the top of frame.
- Independent Driven Z-Axis Motors
- Single Z-Axis Motor (Bottom)
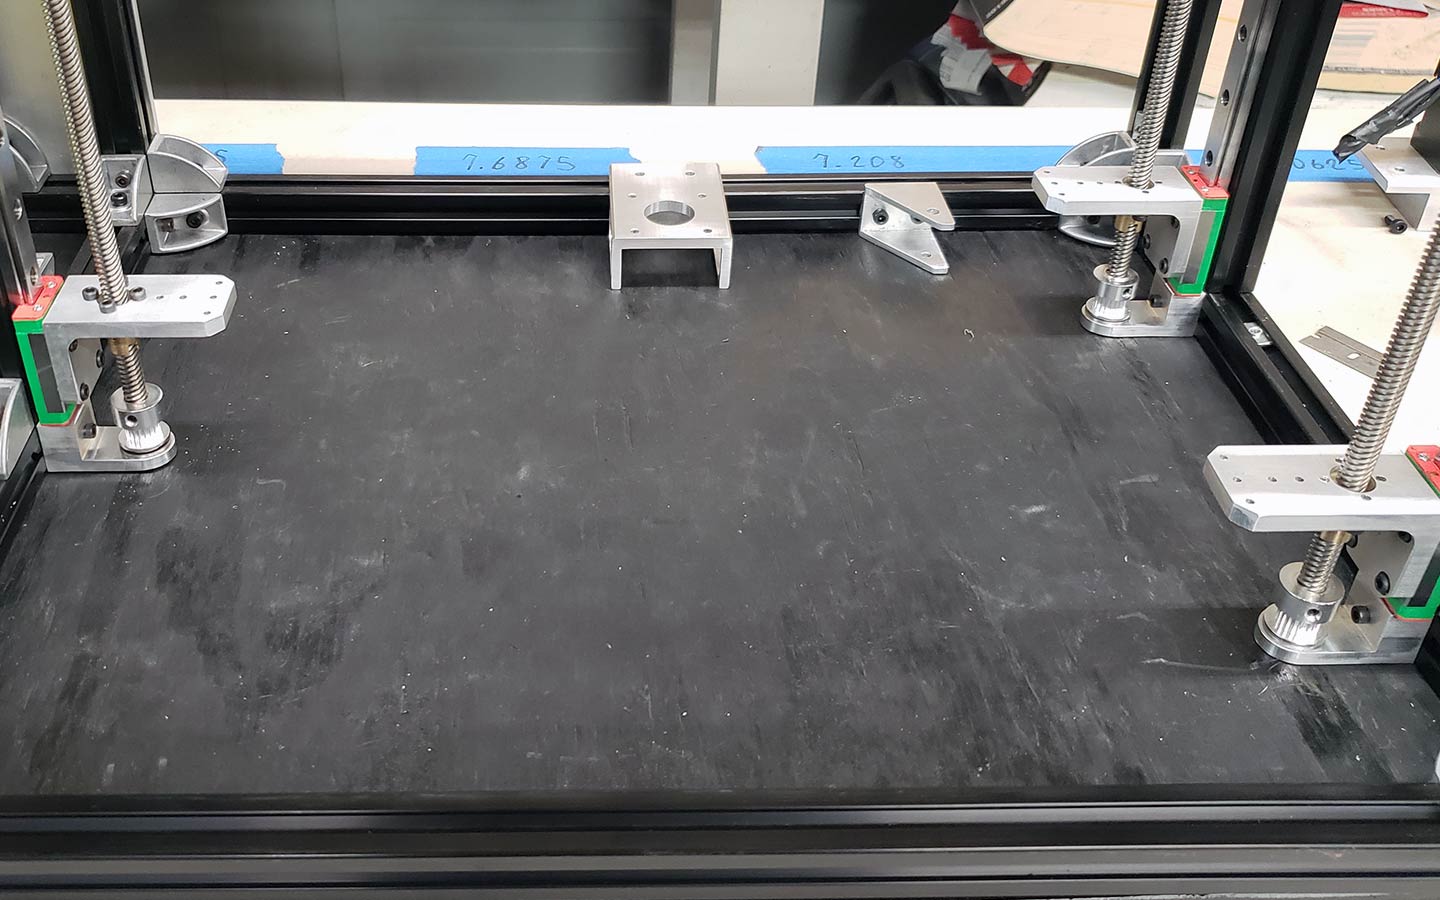
Both z axis designs use 3-point bed leveling. The image below is of the prototype build which uses 12mm ball screw. The new design (yet to be shown) uses lead screw.


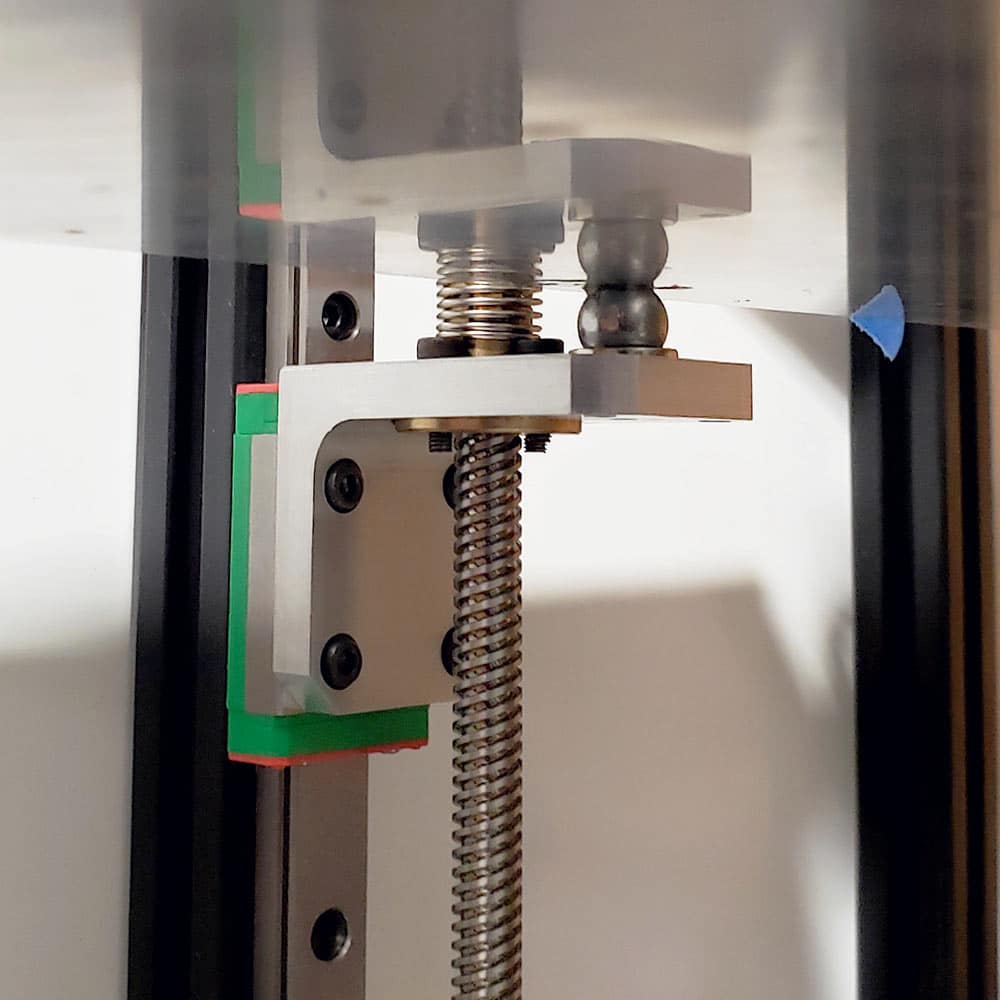
Three Point Kinematic Bed Mount

Although the implementation of the kinematic bed coupling is till in progress, we are designing a mechanism that works for us. Three point bed leveling uses three independently driven lead screws to automatically level the bed and compensate for a bent bed plate or dips .The three z-axis lead screws are used as the three points that make up a triangle and define a plane. 3 points define a plain.
The advantage of a kinematic bed mount is that the defined plane of the bed can raise or lower without binding or twisting, keeping the bed flat. 3-points define a plane, therefore you will need to take into account the synchronization of the lead screws that raise and lower each point of the plane.


Build Plate
We’re using a mic6 tool plate for the bed. Cast Aluminum tool plate is a good solution because it has good thermal conductivity and heats up evenly without warp or twist. The bed needs to be flat and remain level. In three point bed leveling, the three z-axis lead screws are used as the three points that make up a triangle and define a plane.
Since 3 points define a plain 3 screws, evenly placed in a triangle will raise and lower that plain without imparting any twisting forces so the bed will stay flat. A mechanical bind can cause the bed to tilt over time. The advantage of a kinematic bed is that the aluminum plate can expand without causing anything to bend or flex.
Download 3D Model
CoreXY Kit


Belt Layout
The corexy motion system uses crossed belts instead of offsetting the stepper motors giving the belt path a clean run. Simpily offsetting the motors may give a much better alignment path.
The belts don’t have to cross if the pulleys are at different z-levels, I always thought that was bv the difference between the hbot corexy was the corexy belts crossed at the m segment. But the difference between hbot and corexy is that hbot has a single belt on a single plane, corexy can have either 2 “non-intersecting planes” or a single plane + idlers on different levels to keep the belts from touching.
Hypercube for example doesn’t have that “x” because the belts are on different planes. The Railcore has the crossing belts but the belts are on different planes.
Motors at differing planes = straight belt paths
Motors at same plane = Crossing belts
Mechanical Arrangement

Open-Source
Steal our files! We encourage designers and builders of any diy 3d printer project to use our designs. You can download the open source STEP and STL files at:
New Motor Mount Design
Download 3D Models
Download 3D Models
Check out the #BOM provided by Shane Hooper, machinist and designer at @3ddistributed to build your own Corexy 3D Printer ➡ https://t.co/8finMPwrGL pic.twitter.com/fwSuvuEBa3
— Wikifactory (@wikifactory) April 9, 2021
SolidCore Platform
Read More:
https://t.co/BaBMARnzel pic.twitter.com/B3Bq7slGuz
— 3D Distributed #MRRF2020 (@3ddistributed) October 29, 2021
Buy SolidCore DIY 3D Printer Kits & Parts
-
SolidCore CoreXY LightWeight Y-Carriage Upgrade$35.00
-
SolidCore 2020 Frame Gussets$13.00
-
SolidCore X-Carriage Set: Weight Reduced-Light Weight Upgrade$67.00
-
Kinematic Mounting Bracket Kit$75.00
-
MGN12 Linear Rail Stop-Alignment Tool 2020$10.00
-
Kinematic Coupling Mounts With Magnetic Preload$45.00
-
Kinematic Coupled Mounts$25.00
-
Triple Z Idler Mount Set$55.00
-
SolidCore Stealth XY-Motor Mounts Upgrade$50.00
-
SolidCore XY Idler Pulley Bracket$40.00
-
SolidCore CoreXY Mechanism with Motor Mount Upgrade$225.00
-
Kinematic Mounting Bracket-Fixed-Neutral$18.00
-
CoreXY Mechanism$185.00
-
SolidCore Printer Top Plates$45.00
-
Linear Rail Stop 2020$10.00
-
Belt Clamp$3.00
-
Endstop Switch Mount – 2040$8.00
-
SolidCore Side Plates$40.00
-
MGN12 2040 Carriage Stop-Linear Rail Alignment Tool$12.50
-
Hotend Mount BLtouch / E3D$20.00
-
SolidCore Z-Bracket$17.50
-
SolidCore Parts Kit$125.00
-
SolidCore Printer Parts Kit
-
Triple Z / Belted Z-Axis Motor Mount$20.00
-
SolidCore CoreXY Y-Carriage$25.00
-
SolidCore X-Carriage Kit
Can’t tell by this web site whether you sell these if so pricing would help, don’t know if you just sell parts, Kits, or completed 3D Printers
I really like what I see. But don’t have any idea how to do this. Send a brochure or link the gives more info I’m 82 and just finished CAD designs that have been meshed, sliced and G code ready to print. Just need a printer. Larry Jones
Hey Larry, we sell 3d printer kits and 3d printer parts. You can buy a kit on the All Metal Parts Store page. I’ll send you some information.
Hello Shane, looking at SolidCore Printer Parts Kit. Is this complete kit or would require more ( Top plates, metal parts etc ) Can you send me complete list of kit (s) that are needed for complete printer . This is going to be my first 3d printer so would like to have complete parts ( Shipping to alberta, Canada ) . Thanks
Hi All. Love the design & your other designs i.e. the workhorse. I am very interested in building a fixed build plate core xy printer with lead screws for Z. I was wondering why you guys chose a moving bed for the Solidcore over a fixed build plate in Workhorse? Did you discover it caused too many issues? Very interested to hear your thoughts / experiences. Cheers. J
Thanks JM! We were originally planning to have the SolidCore as a conversion kit so people could convert their existing printer or an old 3d printer into a corexy. Since most 3d printers have a cantilever bed we decided to keep the corexy mechanism fixed at the top of the printer. A fixed bed / moving gantry corexy works well. If you look at the print quality of a Voron printer or Mark Rehorst’s UMMD the mechanical arrangement works fine. The good thing about a fixed bed corexy is that the moving mass is in the bottom or middle of the frame so the printer doesn’t move or shake while printing.
Hi where can I find the files for the new idler mounts? the new version aren’t include on thingverse and the idler mounts are glitched on there. Thanks
Hi. Could you send a list of whats needed (not just a basic kit, i mean a complete kit with all the bells and whistles (all upgrades) to make a 400*400*400 3d printer) (or perhaps publish a one link kit that indludes it all
What’s the current status on complete SolidCoreXY kits? Are they available yet? Can we get custom kit with different build volumes?